
![]() We are no longer updating this content regularly. Please visit our knowledge base for most current version.
We are no longer updating this content regularly. Please visit our knowledge base for most current version.
Overview
This feature will set the Active Directory Computer Object Location Attribute value to the name of the Active Directory site the computer belongs to. Maintaining the location attribute value will help locate resources ex. network printers in the domain environment and for report generation purposes.
You must ensure that the security principal Domain Computers or the security group 'SYNERGIX ADCE Managed Computers' is granted WRITE permission to update the Location attribute value of the computer objects in the selected OU or at the top level domain object.
Purpose:
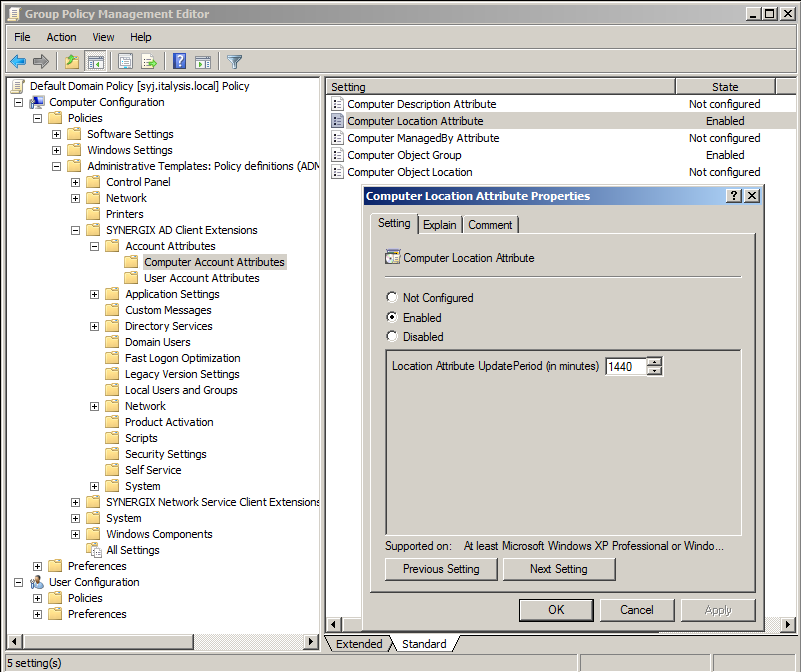
This article provides instructions on testing the SYNERGIX AD Client Extensions software. The Computer Location Attribute feature is configured using the Administrative Template. After Installing the Administrative Template file, the policy setting can be found under COMPUTER CONFIGURATION \ Administrative Templates \ SYNERGIX AD Client Extensions \ Account Attributes \ Computer Account Attributes \ Computer Location Attribute. The Explain tab of the Group Policy setting provides online instructions on configuring the feature.
Prerequisites
- Supported Microsoft Windows Operating System
- Microsoft Windows XP or
- Microsoft WindowsVistaor
- Microsoft Windows 7.0 or
- Microsoft Windows 8.
- NET Framework
- .NET Framework 2.0 for SYNERGIX AD Client Extensions 2012
- .NET Framework 4.0 for SYNERGIX AD Client Extensions 2013
- Domain Membership in Microsoft Active Directory domain
- Ensure the Active Directory Site is defined and appropriate IP Subnets are assigned:
- Launch Active Directory Sites and Services (dssite.msc)
- Right mouse click on Site -- Site Name. Enter Site Name, as appropriate.
- Right Click on Subnet -- New Subnet. Enter IP Subnet, for example, 192.168.1.0/27
- Assign the AD Sites to the newly created IP Subnet
- Microsoft Outlook or other EMail client for Microsoft(R) Windows(TM)
- EMail client is required to submit log files to support@synergix.com or x@mail.asana.com
- SYNERGIX AD Client Extensions 2013
Active Directory Domain Environment
- Single Active Directory Domain environment i.e. Single Forest with Forest Root Domain only example. F10.LOCAL
- You can setup a more complex Active Directory Domain environment, if needed. For example, one forest F10.LOCAL with child domains D10.F10.LOCAL, D11.F10.LOCAL and D12.F10.LOCAL and a trusted forest F20.LOCAL with child domains D20.F20.LOCAL, D21.F20.LOCAL and D22.F20.LOCAL
- Security Group(s)
- Create a security group called "SYNERGIX ADCE Managed Computers". The group type may be Domain Global Group or Domain Local Group.
- Add the test domain computer(s) into the security group "SYNERGIX ADCE Managed Computers"
- Delegate Control
- Launch Active Directory Users and Computers management console ( dsa.msc )
- Select an OU that contains the test computer objects
- Right Mouse click to bring up the context sensitive menu items.
- Select Properties
- Click on Security tab and then, click on Advance button
- Add Domain Computers or Synergix ADCE managed computers Group
- Click on Properties tab
- Select Descendent computer object
- Select checkboxes for READ Location and WRITE location
- Click on OK twice to commit your changes and to close the Properties dialog boxes.
- Configure domain Group Policy Object
- Copy SYNERGIX AD Client Extensions Administrative Template file SYNERGIX-ADCE.ADMX to %SystemRoot%\PolicyDefinitions on admin workstation ( must be Windows 7.0 )
- Copy SYNERGIX AD Client Extensions Administrative Template Language file SYNERGIX-ADCE.ADML to %SystemRoot%\PolicyDefinitions\en-US on same admin workstation ( must be Windows 7.0 )
- Using GPMC.MSC, edit existing or new Group Policy Object.
- In Group Policy Editor, expand COMPUTER CONFIGURATION
- Expand Administrative Templates
- Expand SYNERGIX AD Client Extensions
- Expand Account Attributes
- Expand Computer Account Attributes
- Select Computer Location Attribute
- Click on the Enable radio button to enable the policy setting
- Set Location Attribute Update Period (in minutes), Default is 1440 min.
- Click OK to save the Group Policy settings.
More Information
- Visit Synergix website or contact vendor support
Procedure
- Log into a domain computer with the domain account (your admin account) that has local administrative privileges on the workstation
- Ensure the SYNERGIX AD Client Extensions specific Group Policy settings were applied
- Launch RSOP.MSC or run GPRESULT.EXE /v to confirm
- Install SYNERGIX AD Client Extensions software
- Open the registry key (regedit)
- Navigate to Computer\HKEY_LOCAL_MACHINE\SOFTWARE\Synergix\ADCE\Account Attributes\Computer Account Attributes\Computer Location Attribute. You will find lastUpdate entry is generated, which confirms that the configured feature was run by AD Client Extensions software. It will successfully update Active Directory computer object Location attribute value only if proper permissions were applied.
- If you need to have the feature run before the default time interval of 1,440 minutes, you can delete the lastUpdate entry and wait for about 1 minute for it to re-run. The lastUpdate registry entry will get created.
- Confirm the attribute value was updated,
- Launch Active Directory Users and Computers management console ( dsa.msc )
- Navigate down to OU where the test computers are located
- Select the appropriate test computer object
- Right mouse click or double click to bring up the Properties dialog box
- Select Location tab,
- You should see the updated Active Directory Site name
Note: In a large Active Directory environment, the attribute value may not be visible immediately. Please allow for replication to complete and check the attribute value again.
Test Results
- Pass or
- Fail
Test Result Submission
- Complete the Test Environment worksheet
- Upload test results document file to software test repository
- Upload log files
- ServiceLogfile.txt
- ClientLogfile.txt
- Output of GPRESULTS.EXE /V command
Note: You must use ADCE \ Help \ Submit Log Files button to zip up above 3 files and submit
References
N/A
0 Comments